Submitting
Important Information
- The track has concluded and accepted blogposts are viewable here!
The workflow for creating and submitting a blog post to this track revolves around acquiring a copy
of our blogpost repo, creating your
blogpost in a Markdown file in a specific location, and adding any static images as well as
interactive HTML figures to specific directories.
You’ll then use Jekyll to render and serve your site locally
(allowing you to visualize your post before you submit it) as well as to bundle your work when
you’re ready to submit it.
Prior to exporting, you will anonymize your submission by removing any references to the
authors, as you would normally do for a double-blind paper submission.
Your final submission will be a zipfile (with a specific naming scheme) of the rendered site,
i.e. the _site/ directory that is produced when you run jekyll build.
Once accepted, you will then fork our repository, add your changes, and then open a pull request
to merge in your submissions.
Why can’t you just make a fork of the repo and have your submission as a pull request? Unfortunately, there are a lot of risks with this workflow with regards to violating the double-blind requirement for reviewing. In the future this could be something that can be considered based on community feedback, but for now we operate under the current paradigm of conference reviews.
In this section, we outline the overall process for creating a submission, serving it locally, and exporting it in preparation for the final submission. Because not everyone is familiar with how to setup their environemnts to work with Jekyll, we also provide a Docker container to help with automating several parts of this workflow. This is detailed in the sections below.
Contents
- Download the Blog Repository
- Creating a Blog Post
- Serving and Exporting
- Submitting Your Blog Post
- Merging an Accepted Blog Post
Quickstart
Note: previous instructions stated to set the filename of your blog post to 2022-05-04-[SUBMISSION NAME].md.
This caused your post to be ignored when building the site with jekyll, as future posts are ignored.
Instead, please set the filename of your blog post to 2021-12-01-[SUBMISSION NAME].md
(and all of your asset directories to 2021-12-01-[SUBMISSION NAME]).
This section provides a summary of the workflow for creating and submitting a blog post. For more details about any of these steps, please refer to the appropriate section.
- Download the latest release of our repository here and unpack your archive of choice.
- Create your blog post content as detailed in the “Creating a Blog Post”
section. In summary, you will create a markdown file in the
_posts/directory with the format_posts/2021-12-01-[SUBMISSION NAME].md. Any static image assets will be added topublic/images/2021-12-01-[SUBMISSION NAME]/, and any interactive HTML figures will be added to_includes/2021-12-01-[SUBMISSION NAME]/. Read the relevant section for more details. - Use our docker image to build and serve your blog locally via the
make servecommand. Note that you must have docker installed on your system. Once served, you should be able to see your blog post at theblog/endpoint (default: http://0.0.0.0:4000/blog/). - When ready to submit, use our docker image to build and export your submission via the
make exportcommand. This will produce asite.zipandvars.ymlfile which you will submit to the ICLR venue; see the section on submitting your blog post for more details. Note that there is a 50mb limit on your zipfile submissions! - If accepted, you will fork our repo and add your contributions to the fork, and open a PR against our repository. See the section on merging an accepted blog post for more details.
Download the Blog Repository
Download the latest release of our repository here and unpack your archive of choice. You’re encouraged to track this in a private git repo.
You could alternatively clone our repo, but you’ll then need to strip the git content so you can track it in your own private repository. You shouldn’t fork our repo; while this would be a logical/ideal approach, this unfortunately has some risk with the double-blind requirements for the review process and as such is discouraged. As mentioned previously, this process may change for future iterations of the blog post track as we get feedback from the community, but for now we’ll stick to current review conventions.
Creating a Blog Post
The bulk of your blogpost will be written in a Markdown file
You can check out a sample blogpost, which was
generated by the markdown file in _posts/2021-09-01-sample-submission.md.
You must modify the file’s header as needed.
---
 layout: post
 title: Title goes here
 tags: [tag1, tag2, tag3]
 authors: Anonymous
 <!-- authors: Doe, John, Institution; Doe, Jane, Institution -->
 ---

<!-- content -->
You must change the title, tags, and eventually the authors fields (ensure that the
submission is anonymous for the review process).
The authors and title fields accept standard strings, but the tags field must be an array
(i.e. a string starting with [, followed by a comma-separated list of tags, followed by ]).
Add any tags that are relevant to your post, such as the areas your work is relevant to. Read our sample blogpost carefully to see how you can add image assets, and how to write using $ \LaTeX $! Read about rendering your post locally bellow.
Important: make sure your post is completely anonymized before you export and submit it!
Before going any further, it may be useful to highlight exactly what folders and files you are Even if you use one of our simpler quickstart methods, this will always be what’s happening behind the scenes.
If you clone our repo or download a release, you will find a directory structure that looks like the following (excluding all files and directories that are not relevant to your submission):
iclr-blog-track.github.io/
│
├── _includes
│   ├── 2021-12-01-[YOUR SUBMISSION]         # <--- Create this directory and add HTML figures here
│   │   └── [YOUR HTML FIGURES].html
│   └── ...
├── _posts
│   ├── 2021-12-01-[YOUR SUBMISSION].md      # <--- Create this file; this is your blogpost
│   └── ...
├── public
│   ├── images
│   │   ├── 2021-12-01-[YOUR SUBMISSION]     # <--- Create this directory and add static images here
│   │   │   └── [YOUR IMAGES].png
│   │   └── ...
│   └── ...
└── ...
Your blogpost markdown file will go in _posts/2021-12-01-[YOUR SUBMISSION].md.
Any static images should go in public/images/2021-12-01-[YOUR SUBMISSION]/.
Any interactive HTML figures should be saved in _includes/2021-12-01-[YOUR SUBMISSION].
You should not touch anything else in the blog post release; everything else will be set by
the conference committee.
Note that 2021-12-01-[YOUR SUBMISSION] serves as a tag to your submission, so it should be the
same for all three items.
For example, if you’re writing a blog post called “Deep Learning”, you’d likely want to make your
tag 2021-12-01-deep-learning, and the directory structure would look like this:
iclr-blog-track.github.io/
│
├── _includes
│   ├── 2021-12-01-deep-learning             # <--- Create this directory and add HTML figures here
│   │   └── [YOUR HTML FIGURES].html
│   └── ...
├── _posts
│   ├── 2021-12-01-deep-learning.md          # <--- Create this file; this is your blogpost
│   └── ...
├── public
│   ├── images
│   │   ├── 2021-12-01-deep-learning         # <--- Create this directory and add static images here
│   │   │   └── [YOUR IMAGES].png
│   │   └── ...
│   └── ...
└── ...
Serving and Exporting
So far we’ve talked about how to get the relevant repository and create a blog post conforming to our requirements. Everything you have done so far has been in Markdown, but this is not the same format as web content (typically HTML, etc.). You’ll now need to build your static web site (which is done using Jekyll), and then serve it on some local webserver in order to view it properly. We will now discuss how you can serve your blog site locally, and then export your submission so you can submit it to the ICLR venue.
Method 1: Using Our Docker Image
We provide a Docker image to help you with serving and exporting your blog post. This container has all of the necessary Jekyll dependencies installed, and can serve your blog without you needing to install anything else. This section requires that you have Docker installed - you can follow their official installation instructions relevant for your operating system.
Serving
To build your blog post (in the context of our website) and serve it locally, you can use our provided Docker image. We provide a Makefile in the root of our repository, with commands to make running the docker container easier. To serve your blogpost saved in the same directory and serve it on port 4000, you can run
make serve
Note that this automatically pulls the latest docker image for you, so you don’t need to manually do
a docker pull.
You should see similar output in your shell:
ruby 2.7.1p83 (2020-03-31 revision a0c7c23c9c) [x86_64-linux-musl]
Configuration file: /srv/jekyll/_config.yml
           Cleaner: Nothing to do for /srv/jekyll/_site.
           Cleaner: Nothing to do for /srv/jekyll/.jekyll-metadata.
           Cleaner: Removing /srv/jekyll/.jekyll-cache...
           Cleaner: Nothing to do for .sass-cache.
ruby 2.7.1p83 (2020-03-31 revision a0c7c23c9c) [x86_64-linux-musl]
Configuration file: /srv/jekyll/_config.yml
            Source: /srv/jekyll
       Destination: /srv/jekyll/_site
 Incremental build: disabled. Enable with --incremental
      Generating...
                    done in 0.97 seconds.
 Auto-regeneration: enabled for '/srv/jekyll'
    Server address: http://0.0.0.0:4000/
  Server running... press ctrl-c to stop.
If you see this, your built site should be accessible at http://0.0.0.0:4000/,
and your post will be accessible at http://0.0.0.0:4000/blog/.
If you make any changes to your blog post, the server should automatically pick these up and display
the updated content (so you don’t need to constantly spin the container up and down to render new
content).
The only exception is if you somehow cause the web server to crash, you will need to run
make serve again.
If you want to point to a different directory, or use a different port, you can specify these as environment variable arguments:
make serve -e BLOG_PATH="/absolute/path/to/blogpost/dir" PORT=5000
Exporting
Important: make sure your post is completely anonymized before you export and submit it!
To export your submission, you can run
make export
to process and zip up your submission from the same directory. You should see a similar output in your shell:
SUBMISSION URL:   https://iclr.iro.umontreal.ca/7150a9b0-e409-4d67-bbae-f452e0d86437_1638570055
SUBMISSION UUID:  7150a9b0-e409-4d67-bbae-f452e0d86437_1638570055
Building site...
ruby 2.7.1p83 (2020-03-31 revision a0c7c23c9c) [x86_64-linux-musl]
Configuration file: /srv/jekyll/_config.yml
           Cleaner: Removing /srv/jekyll/_site...
           Cleaner: Nothing to do for /srv/jekyll/.jekyll-metadata.
           Cleaner: Removing /srv/jekyll/.jekyll-cache...
           Cleaner: Nothing to do for .sass-cache.
ruby 2.7.1p83 (2020-03-31 revision a0c7c23c9c) [x86_64-linux-musl]
Configuration file: /srv/jekyll/_config.yml
            Source: /srv/jekyll
       Destination: /srv/jekyll/_site
 Incremental build: disabled. Enable with --incremental
      Generating...
                    done in 0.98 seconds.
 Auto-regeneration: disabled. Use --watch to enable.
Zipping submission...
#   adding: ...submission content... (stored 0%)
Cleaning up...
Done exporting submission!
Once again you can specify an alternative directory using the BLOG_PATH argument:
make export -e BLOG_PATH="/absolute/path/to/blogpost/dir"
This will produce a site.zip and vars.yml file which you will submit to the ICLR venue; see
the submission section for more details.
For more information on what’s happening within the container to export your submission, see the
manual export section which describes the exact process required to zip your
submission.
Method 2: Using Jekyll Manually
For users wishing to not use a Docker container, you can install Jekyll directly to your computer and build the site using Jekyll directly. This is done at your own risk, as there are many potential points of error! If your submission is not consistent with the ones produced by our Docker container, your submission may be rejected!
Installation
You will need to manually install Jekyll which will vary based on your operating system. You will also need to install yq (a command line YAML processor), as this will be used when you export your submission. The instructions here are only for convenience - you are responsible for making sure it works on your system and we are not liable for potential issues that occur when adding your submissions to our servers!
Ubuntu/Debian
- Install Ruby
sudo apt install ruby-full - Once installed, add the following to your
.bashrcor whatever terminal startup script you may use (this is important because otherwise gem may complain about needing sudo permission to install packages):export GEM_HOME="$HOME/.gem" export PATH="$HOME/.gem/bin:$PATH" - Install Jekyll:
gem install jekyll - When exporting your submission, you will need yq
(a command line YAML processor). Install via snap:
sudo snap install yq
MacOS and Windows
Mac and Windows users can find relevant guides for installing Jekyll here:
Manual Serving
Once you’ve installed jekyll and all of the dependencies, you can now serve the webpage on your local
machine for development purposes using the jekyll serve command.
In your terminal, from the directory containing the Jekyll project run:
jekyll serve
You should see something along the lines of:
> jekyll serve
Configuration file: /home/USER/ift6758-blog-template/_config.yml
            Source: /home/USER/ift6758-blog-template
       Destination: /home/USER/ift6758-blog-template/_site
 Incremental build: disabled. Enable with --incremental
      Generating...
                    done in 0.661 seconds.
 Auto-regeneration: enabled for '/home/USER/iclr-blog-track.github.io'
    Server address: http://127.0.0.1:4000/
  Server running... press ctrl-c to stop.
If you see this, you’ve successfully served your web page locally!
You can access it at server address specified, in this case http://127.0.0.1:4000/ (and the blog
posts should once again be viewable at the blog/ endpoint).
Manual Export
Important: make sure your post is completely anonymized before you export and submit it!
To prepare your blog post for submission, run the export.sh script found in the
root of the ICLR repository (requires yq)
The script creates a UUID for your submission and prepares a URL for your submission such that it
is compatible with our hosting servers.
Note that this process will modify _config.yml directly with the new URL; the original config
file will be saved to _config.yml.bak.
If the export script runs successfully, the changes are reverted.
However if it fails somewhere after the original _config.yml file was overwritten, you will have
to manually revert the changes via mv _config.yml.bak _config.yml.
Run the script via:
./export.sh
This will produce a site.zip and vars.yml file which you will submit to the ICLR venue.
Below are details on what the script does.
#!/bin/bash

# create backup of the original _config.yml
cp ${PWD}/_config.yml ${PWD}/_config.yml.bak

# generate a custom unique URL for post compatible with our hosting server, overwrite _config.yml
GHP_UUID="https://iclr.iro.umontreal.ca/$(uuidgen)_$(date +%s)" yq e -i '.url = strenv(GHP_UUID)' ${PWD}/_config.yml
GHP_UUID_URL="$(yq e '.url' ${PWD}/_config.yml)"
GHP_UUID="$(echo ${GHP_UUID_URL##*/})"

echo "SUBMISSION URL:\t${GHP_UUID_URL}"
echo "SUBMISSION UUID:\t${GHP_UUID}"

# build site
echo "Building site..."
jekyll clean
jekyll build

# store metadata
printf "%s\n" "url: $GHP_UUID_URL" "uuid: $GHP_UUID" > vars.yml

# create zip
echo "Zipping submission..."
rm -rf site.zip
cp -r _site $GHP_UUID
cp vars.yml $GHP_UUID/
zip -r site.zip $GHP_UUID

# clean up
echo "Cleaning up..."
rm -r ${PWD}/${GHP_UUID}
rm ${PWD}/_config.yml
cp ${PWD}/_config.yml.bak ${PWD}/_config.yml

echo "Done exporting submission!"
Submitting your Blog Post
Once you’ve exported your blogpost using one of the methods described above and have a site.zip
and vars.yml file, you’re ready to submit your post.
Navigate to the OpenReview venue.
Click on the “Add ICLR 2022 Track Blog Submission” button, and you should see a dialogue with several fields.
Most of the fields are self explanatory: enter your post title, authors, keywords, and abstract as per typical paper submissions.
For the actual content of your blog, you will see a Submission Full and Blogpost URL field:
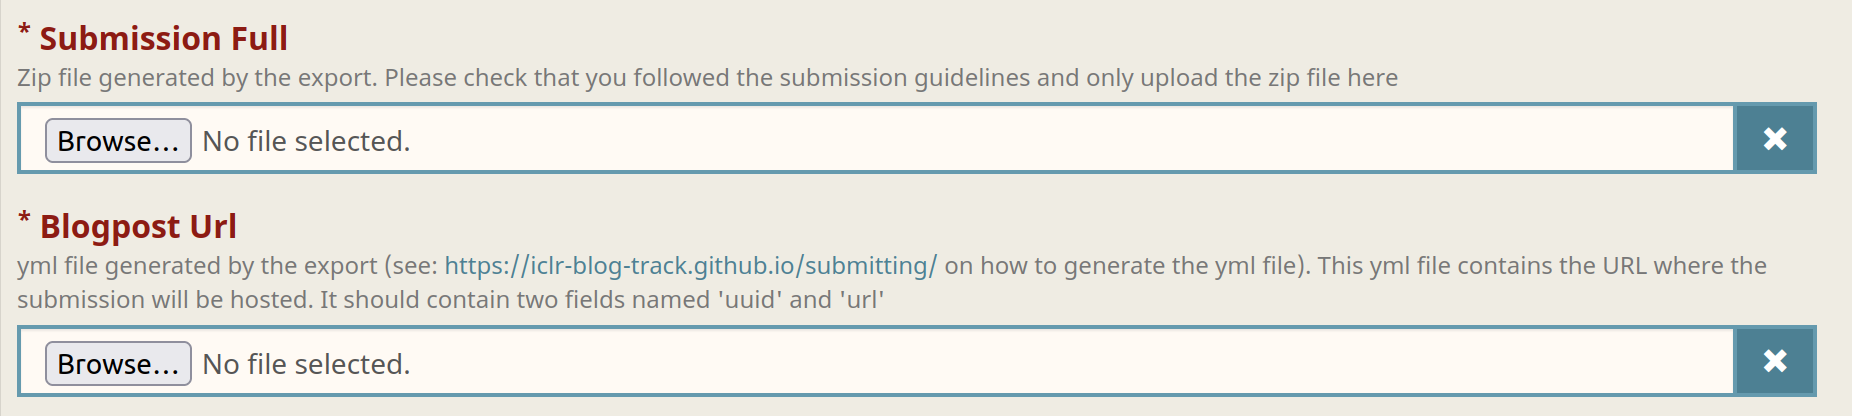
-
Upload the generated
site.zipfile containing your entire submission to theSubmission Fullfield. Note that there will be a 50mb limit on your zipfile submissions - make sure that your zipfile does not exceed this! If you’re having issues with the size of your zipfile, try removing the_sitedirectory that is generated when runningmake serveormake exportbefore re-runningmake export. -
For the
Blogpost URLfield, upload the generatedvars.ymlfile (which was generated in the same directory that exporting your submission generated thesite.zipfile). It should look something like this:url: https://iclr.iro.umontreal.ca/038d20d0-869a-49ef-a475-d024e3883f6e_1640977316 uuid: 038d20d0-869a-49ef-a475-d024e3883f6e_1640977316
Merging an Accepted Blog Post
If your submission is accepted after the review process, you will merge in your changes through a Github pull request. You will not have permission to push directly to our repository; instead you must fork our repo, add and commit your changes to your fork (which should be a single markdown file and optionally two asset directories), and then open a pull request to our repository. An overview of this process can be found in the official Github docs. We additionally provide optional instructions for hosting github pages on your own github account in order to preview your post before submitting the pull request, but this is not required if you don’t wish to preview the pages.
Merging your contributions
-
Fork the main ICLR blog track repository: https://github.com/iclr-blog-track/iclr-blog-track.github.io. Create a branch where you will be staging all of your content for the pull request.
-
(Optional*) If you wish to preview your posts before making a pull request, you can follow the instructions provided in Previewing your blog posts section to setup github pages on your fork. This is strictly for debugging purposes and is not required if you wish to just proceed with a pull request.
*Note: if you follow these steps, we ask that you take down the hosted site when you’re done with the pull request to avoid any potential confusion with the official ICLR site.
-
Upload your post and assets. Ensure you implemented any of the changes/modifications requested by the reviewers on OpenReview. As a reminder, your contributions should be:
- Your blog post in
_posts/2022-03-25-[YOUR SUBMISSION].md - (Optionally) any static images must be in
public/images/2022-03-25-[YOUR SUBMISSION]/ - (Optionally) any HTML content must be in
_includes/2022-03-25-[YOUR SUBMISSION]/
where
2022-03-25-[YOUR SUBMISSION]is the same string across the blog post file and two directories (note the updated date). Any other changes in your pull request will be rejected and you will be asked to modify your PR accordingly. Visually, we expect the changes to look like the following:iclr-blog-track.github.io/ │ ├── _includes │ ├── 2022-03-25-[YOUR SUBMISSION] # <--- Directory containing of any HTML figures (if necessary) │ │ └── [YOUR HTML FIGURES].html │ └── ... ├── _posts │ ├── 2022-03-25-[YOUR SUBMISSION].md # <--- Your actual post (required) │ └── ... ├── public │ ├── images │ │ ├── 2022-03-25-[YOUR SUBMISSION] # <--- Directory containing any static images (if necessary) │ │ │ └── [YOUR IMAGES].png │ │ └── ... │ └── ... └── ... - Your blog post in
-
Create a pull request to our repo’s master branch. You can do so by clicking on the
Contributebutton when on your new fork.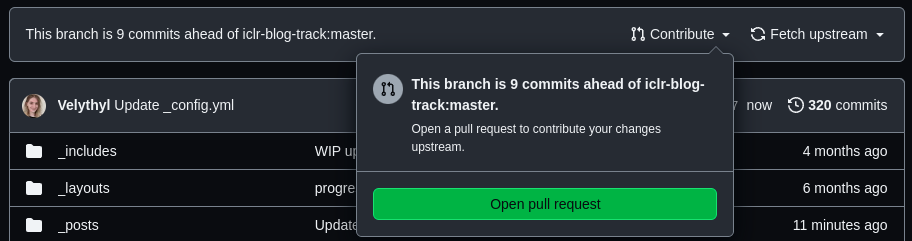
CRITICAL: make sure that the base repository is the ICLR blog track’s blog, and not
poole/lanyon!
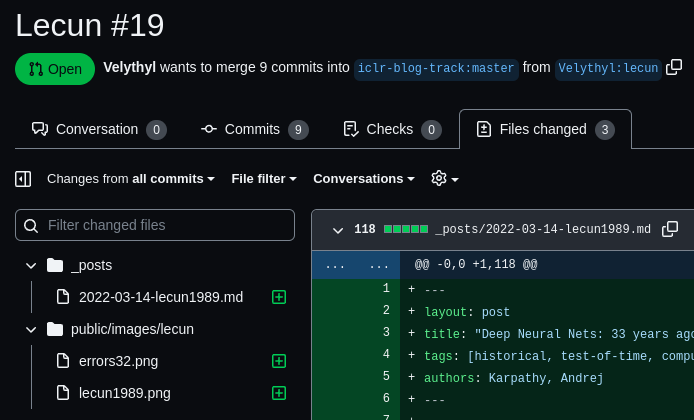
Please name your PR with the format:
[OPENREVIEW #] - [POST TITLE], for example:100 - Towards Deep Learning Blog Posts. Please use the pull request template provided. It should automatically populate your pull request, and look like the following:## OpenReview Submission Thread - [url to your submissions Openreview thread] ## Checklist before requesting a review - [ ] I have followed the instructions and have only added changes as specified in the submission instructions (blog post and asset directories with correct naming scheme) - [ ] I have implemented the necessary changes in response to reviewer feedback - [ ] (optional, for tracking) I deployed github pages on my fork in order to preview my post - [ ] If yes, I have deleted my hosted github page once this pull request was closed (to be completed upon closing this PR) ## Changes implemented in response to reviewer feedback - n/a ## Any other comments - n/aAs a sanity check, the only files changed in this PR should be your post and its assets.
-
We will then review your PR and merge it.
(Optional) Previewing your blog posts
To help you verify that your blog post will render correctly, you can host the blog post page on your own github account. Follow these steps after forking our repository:
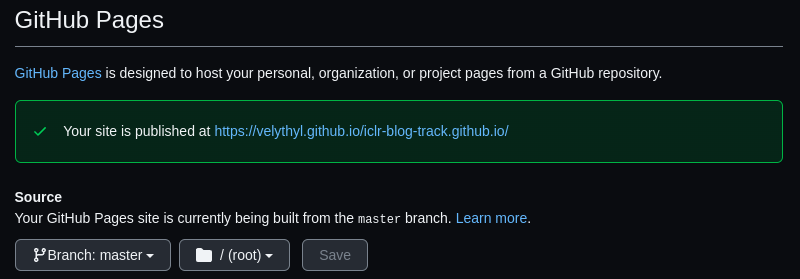
-
Go to
Settings->Code and Automation->Pages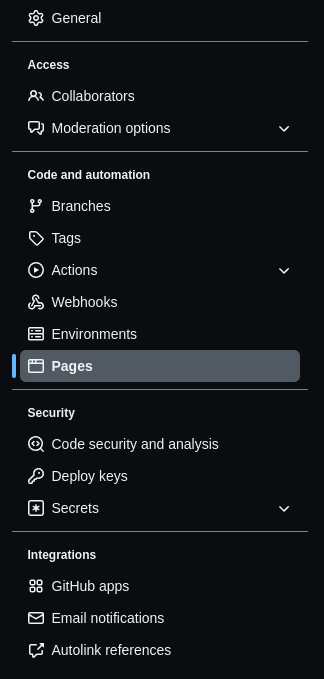
-
Select branch “master” in Source dropdown; doing so will provide you with a URL upon success. Take note of this URL!
-
Go back to the main repository overview. Wait a few minutes for Github to populate the website.
-
Edit the
urlparameter in_config.yml. You can comment out the old url and add the one you obtained in step 2.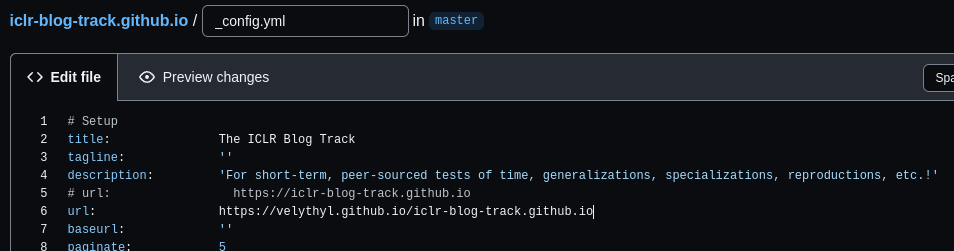
-
When you are ready to make your PR, create a branch named using your blog post’s title. In this branch, undo your changes to the
_config.ymlas we do not want these changes in our own repo. -
To delete your published site, change the branch
Sourcethat you specified in step 2 toNone.